Beginner Series: Git and Github
Introduction
Welcome to the Beginner Series! This is a series of posts designed to introduce people to different concepts and technologies that I think are cool or useful.
This tutorial will give you a brief overview of how to get started with Git. Git is a tool that is used for version control and collaboration, and it is an essential part of working on any large coding project.
In this guide, we will be going over how to do some basic operations:
- Creating a new “repository”
- Downloading your repository to your local machine
- Making changes to the repository
- “Pushing” your local changes
- “Pulling” any remote changes
There are a lot of features that Git provides, but these are the most basic ones, and are all that you need to get started!
Table of Contents
You can use these links to skip around between different sections in the tutorial.
- Prerequisite: Install Git and create a Github Account
- Creating a Repository on Github
- Cloning Your Repository
- Finding Your Files
- Editing Your Files
- Pushing Your Local Changes to Git
- Pulling Remote Changes to Your Local Machine
Prerequisite: Install Git and create a Github Account
Before we can start working with Git, we need to actually install it on our computer! You can go to this link to learn how to install Git on your specific operating system.
Once you’ve done that step, you should be able to use Git on your computer. You can confirm that this works by typing git --version in your terminal.
You should see output like git version 2.24.1 (Apple Git-126). If you see something like command not found: git, then the installation probably did not work and you should try again.
After this step, we want to create a Github account. Github is a website that lets you host your code and collaborate on projects with others. You can think of it as something like Google Drive, where you can upload your projects, download them, and share projects with others.
Step 1: Creating a Repository on Github
Each Git project is called a “repository”. A repository tracks all the changes that you make to your code, and allows you to use Git features like “pushing” and “pulling”. To create a new repository, go to github.com/new/.
Once on that page, you should see this view:

These are the steps to create a new repository
You have to fill out this form to create a new Git repository. You can fill out most of these fields with whatever you want, such as Repository name and Description. However, when creating this first repository, make sure that the “Add a README file” box is checked.

Select the "Add a README file" option
This will create a single file called README.md in your repository, instead of creating a new empty repository. The README.md is the first thing people see when they view your repository on Github, so it is a great place to put a description of your project, or instructions on how to use it.
Step 2: Cloning Your Repository
Now that our repository is created on Github, we are in an interesting situation. Our repository exists remotely on Github, but it doesn’t exist locally on our personal computer. Imagine a file that exists on Google Drive, but you don’t have on your computer. So, our next step is to download our repository to our local computer.
When working with Git, downloading/copying a repository to our computer is referred to as “cloning” the repository. From here on out, that is how I will be referring to it.
To clone our repository from Github, we need to view the repository online. It should already be pulled up in your browser after creating the repository, but if it isn’t, you can go to https://github.com/<your_username>?tab=repositories and click on a specific repository.
When you have a specific repository open, you should see this view (with a different repository name and username):
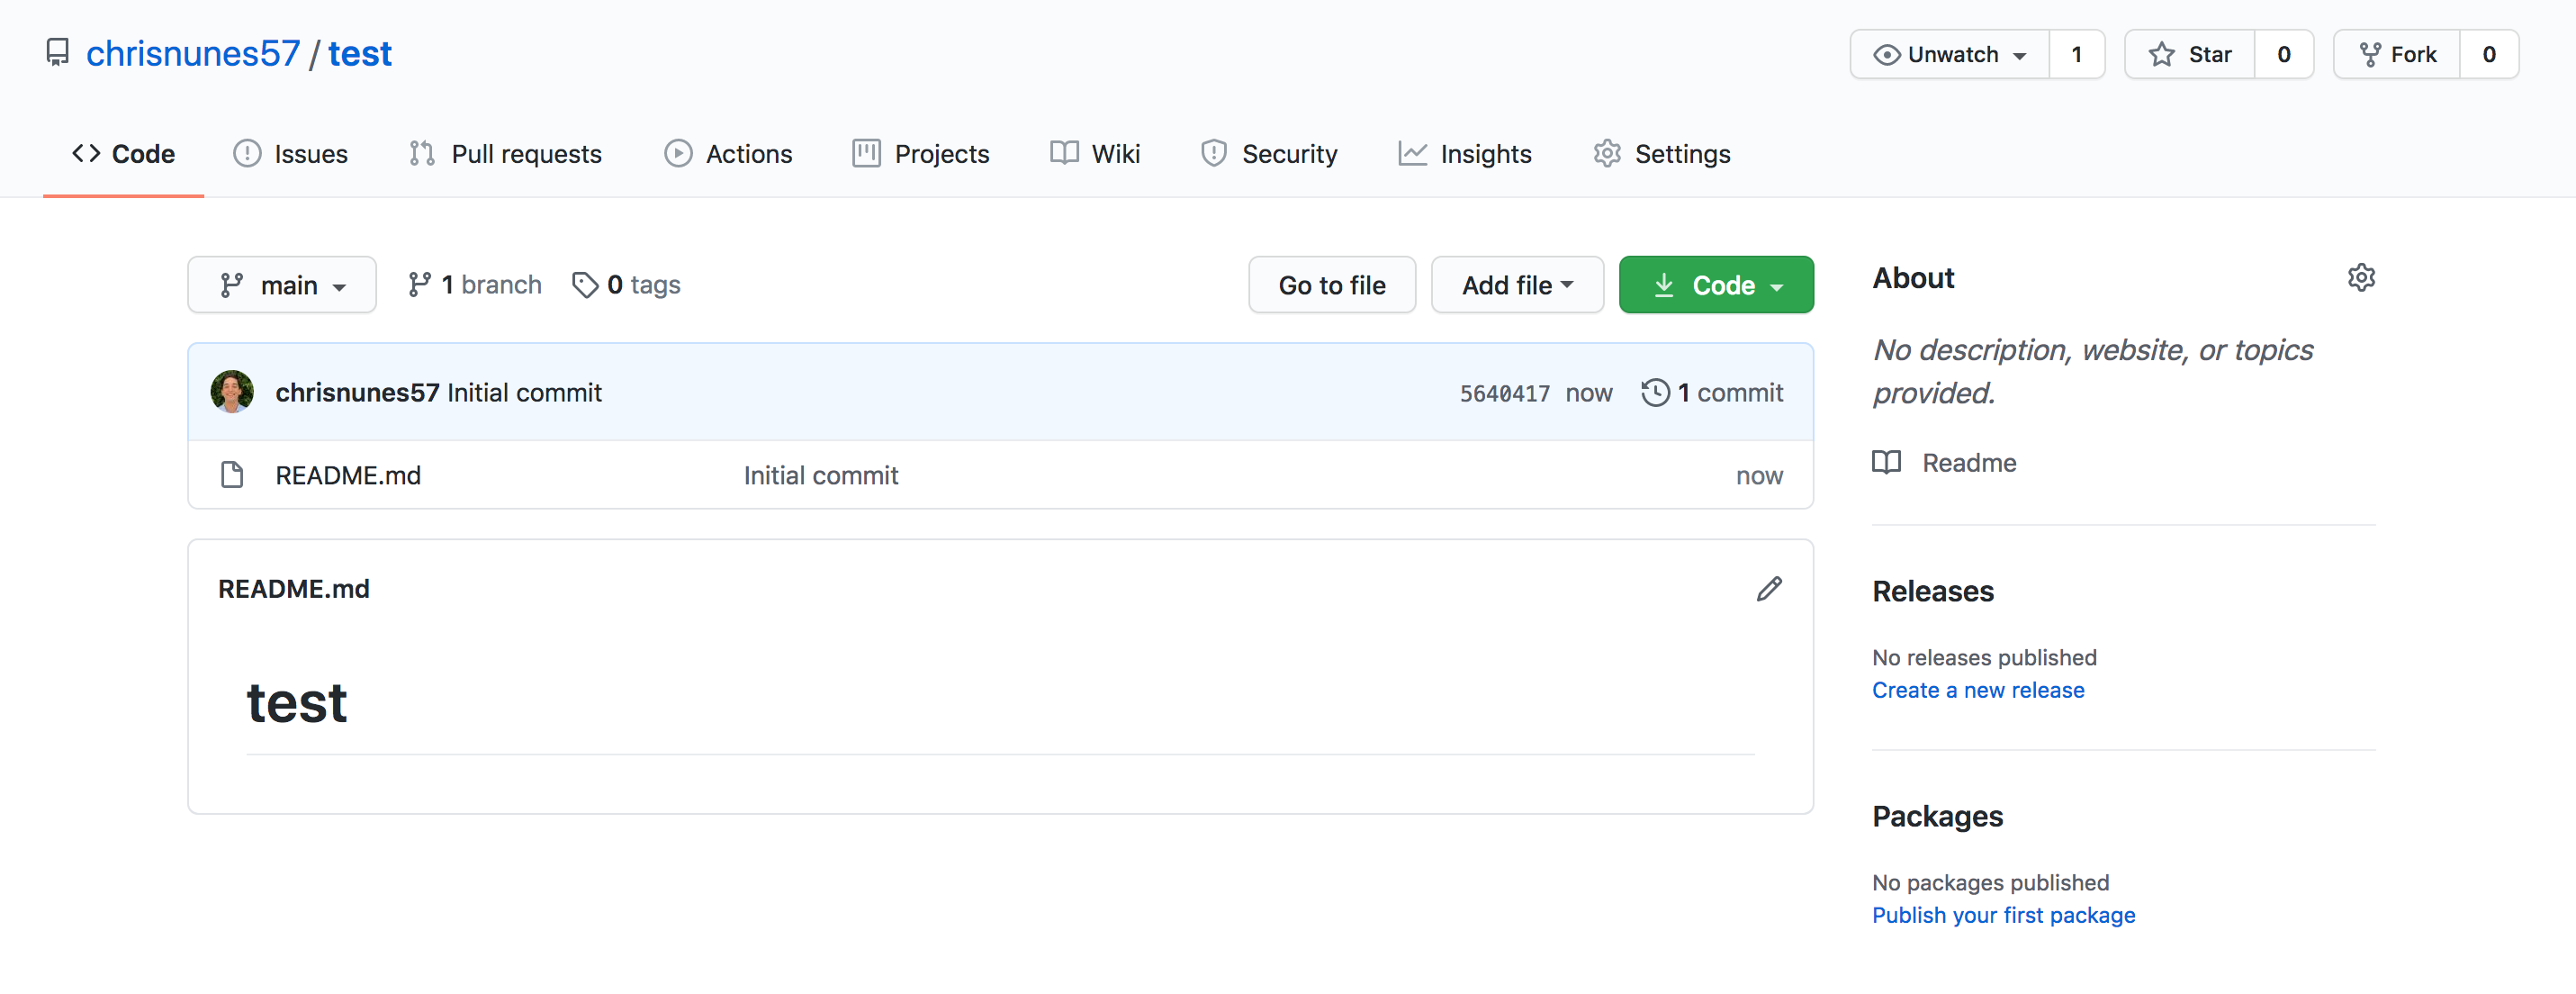
Your empty repository!
This shows you all the files that are in your repository, as well as other information such as the repository name, the description, and other useful things. This is a nice page to go to find any information you need about a repository.
To clone our repository, all we care about is the green button that says Code. If you click on it, it will open a little window showing you different ways to clone your repository.
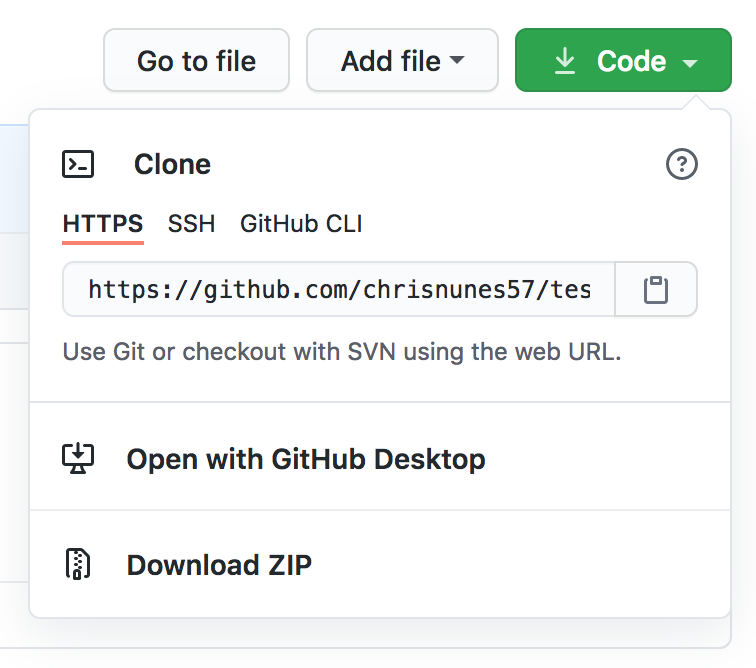
You want the url that starts off "https://github.com/your_username/...."
These options (HTTPS, SSH, and Github CLI) all have different uses, but for this tutorial, we will use HTTPS. To clone your repository, first copy the URL that it shows you in the dialogue box.
Then, open up a terminal window on your computer and navigate to the directory where you want to clone the repository. For instance, you could navigate to your desktop directory.
Then, enter the command git clone <github_url>, where <github_url> is the HTTPS url that you copied a moment ago. If everything is set up correctly, the repository will be cloned, and you will see the following:

Cloning Git repository from the terminal
Once that command successfully executes, the repository will be on your computer, and there will be a folder on your computer with all the repository files on it.
If you know where this repository is located on your computer, you can skip to Step 4. If not, Step 3 will tell you how to find your repository!
Step 3: Finding Your Files
If you’re not familiar with Git or using your terminal, your first question will probably be something like “Where did the files get downloaded? How do I find them?”. These are fair questions that we need to resolve before moving on.
Rather than doing a scavenger hunt to find the files, we’re going to run a command to find where the repository was downloaded. In your terminal where you just cloned the repository, run the command that matches your computer:
- MacOS/Linux:
pwd - Windows:
cd
These commands will both output one line containing the current directory. The current directory also happens to be the directory where we just cloned our repository! We can use this info to find where our repository is in our file system.
So for example, if pwd or cd tell you that you’re in the directory Users/Chris/Desktop, and the name of your repository is test-repo, then the path to the repository will be Users/Chris/Desktop/test-repo.
Once our files are located, we can go to the next step, which is opening our files to edit them.
Step 4: Editing Your Files
If you’re following this tutorial, you’re probably at least somewhat familiar with writing code. At the very least, you’ve edited a file before. All that we’re doing in this step is editing our README.md file so that we have some changes to push to Git.
To begin, open the recently cloned README.md file in any kind of text editor. Change your file so that it looks something like this:
# My first Github Repository!

I am learning how to use Git and Github, and this is my first repository!
The specifics don’t matter, we just want to make sure it’s different than it was before. Save your changes, and we’re ready for the next step!
Step 5: Pushing Your Local Changes to Git
Right now, we have local changes on our computer, but our remote repository doesn’t have the changes. This is consistent with our Google Drive Analogy. If you download a file from Google Drive and edit it, the version of the file on Google Drive won’t be changed until you re-upload the file.
So logically, once we’ve made our local changes, the next step is to “push” the changes to the remote version. However, first we need to learn about Git commits. A Git commit is like a milestone or checkpoint along the timeline of a Git project. When you make a commit, you are encapsulating all the changes that have been made since the previous commit.
Another important Git concept is adding files to Git. While Git automatically tracks all the changes you make to your files, it won’t actually care about the changes unless you use the git add command. Using git add <filename> tells Git that you want to include the <filename> file in the next commit.
With those two concepts in mind, here is how the process of pushing local changes to Github works:
- Tell Git which changes you want to add, using the
git add <filename>command - Create a single commit to summarize the changes you have made using the
git commit -m "<message>" - Finally, push our new commit (and all the changes it contains) to our remote repository using
git push
Example Add/Commit/Push
We’ll use our changes to README.md to demonstrate how this works. At this point, your README.md file should be updated with more text, like this:
# My first Github Repository!

I am learning how to use Git and Github, and this is my first repository!
Now that the change is done, we should make sure that Git has noticed. In your terminal window, navigate into the git repository. Once there, run git status. You should see something like this:

The modified file is highlighted in red
As we can see, Git sees that README.md has been modified. We can also see that Git says that there are “no changes added to commit”. We can fix this by using the command git add README.md. This command should give back no output (if all goes well).
Once you have added the README.md file, re-run git status to see what has changed.
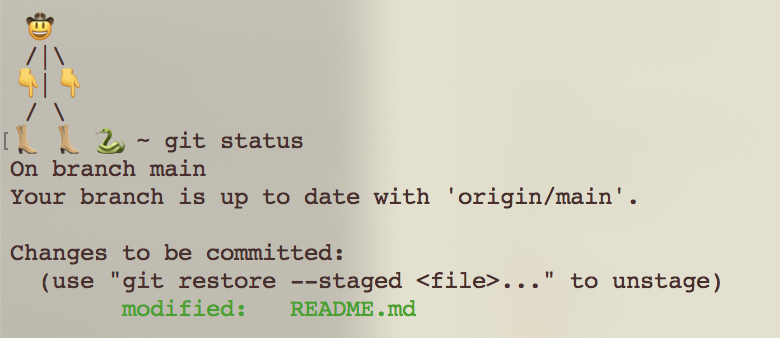
Now that we have used 'git add', the file is green
Now, our modified README.md is now ready to be committed! To commit the change, we use the git commit -m "<message>" command, where <message> is an informative message describing what changes were made.
To commit the README.md changes, I would use the command git commit -m "updated README with repo description". As you can see, the message doesn’t have to be particularly formal or long, it only has to describe the changes made.

Using 'git commit' with a commit message
Once you have run the git commit command, we are ready to push our code to the remote repository. This command is simple: git push. Running this command should give the following output:
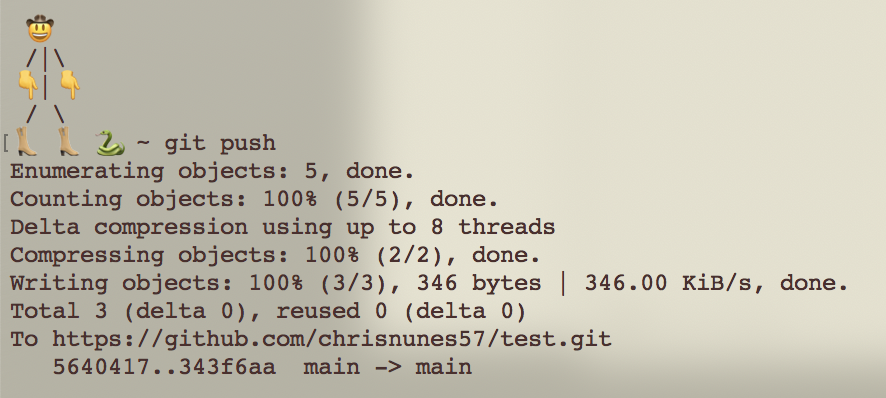
A lot of nonsense, but no errors!
If all goes well, our change should be pushed to the remote repository! We can easily verify that the changes are present by opening/refreshing the repository page on Github. Now that the README.md is changed, so has the repository web page!
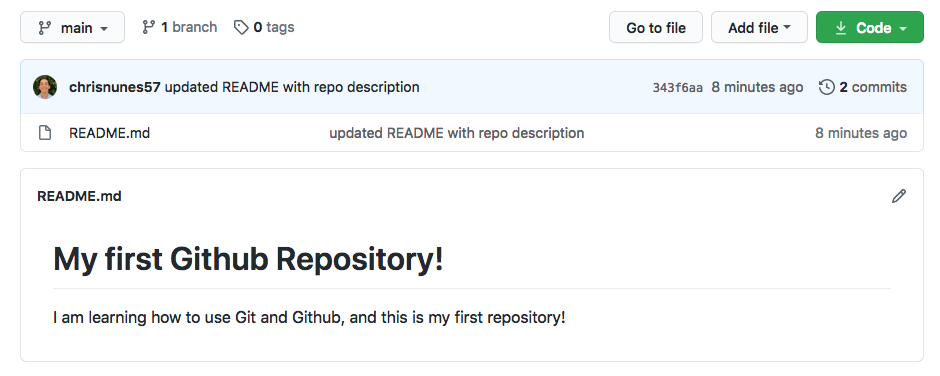
Our repository shows our changes!
Woohoo! Let’s review what we’ve done.
- Created a repository on Github
- Cloned the repository to our local machine
- Edited one of the files in the repository
- Added the changed file to our next commit using
git add - Created a new commit of our changes using
git commit - Pushed our local changes to Github using
git push
On top of all of this, there is one more important skill that we need to learn in order to collaborate using Git. We have learned how to add our local changes and push them to the remote repository, but we don’t know how to pull remote changes onto our local machine.
We could do this by re-cloning the repository every time we wanted new changes, but this would cause us to lose any local changes that we hadn’t saved, and it would be very overkill. As it turns out, there is a way to pull only the changed files from the remote repository, instead of re-cloning the entire repository.
Step 6: Pulling Remote Changes to Your Local Machine
We can pull changed files onto our local machine by using the git pull command. This command will download all the changed files in the remote repository to your local repository.
This command is very useful when working on projects with other people! For example, if you are working on a project with a friend, you can both just push your own code and pull the other’s code easily.
Fun fact: before I knew how to use Git, my friends and I would always send code back and forth through email or Facebook chat. Git has made collaboration much faster and better!
Creating a Remote Change
In order to actually demonstrate the git pull command, we need changes in our remote repository that do not exist locally. So, we need to edit our remote repository using the Github web interface.
To do this, view your repository on Github and find the “Edit README” button on the main page (circled in red).
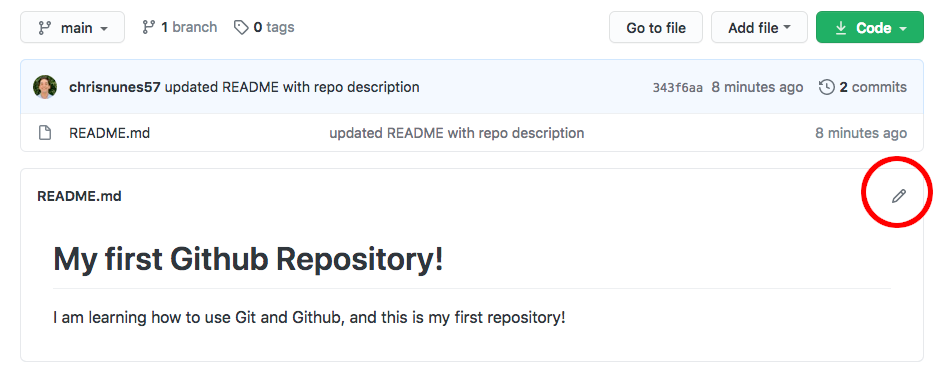
Click on the pen icon circled in red
Click on this button, and it will take you to a screen where you can edit your README.md file. For the sake of this example, just change your README.md file in some noticeable way.
For example, I edited my file to look like this:
# My first Github Repository!

I am learning how to use Git and Github, and this is my first repository!

I made this change from Github.com! :0
Once you’ve edited the text to something you like, scroll down until you find the “Commit Changes” section of the page.
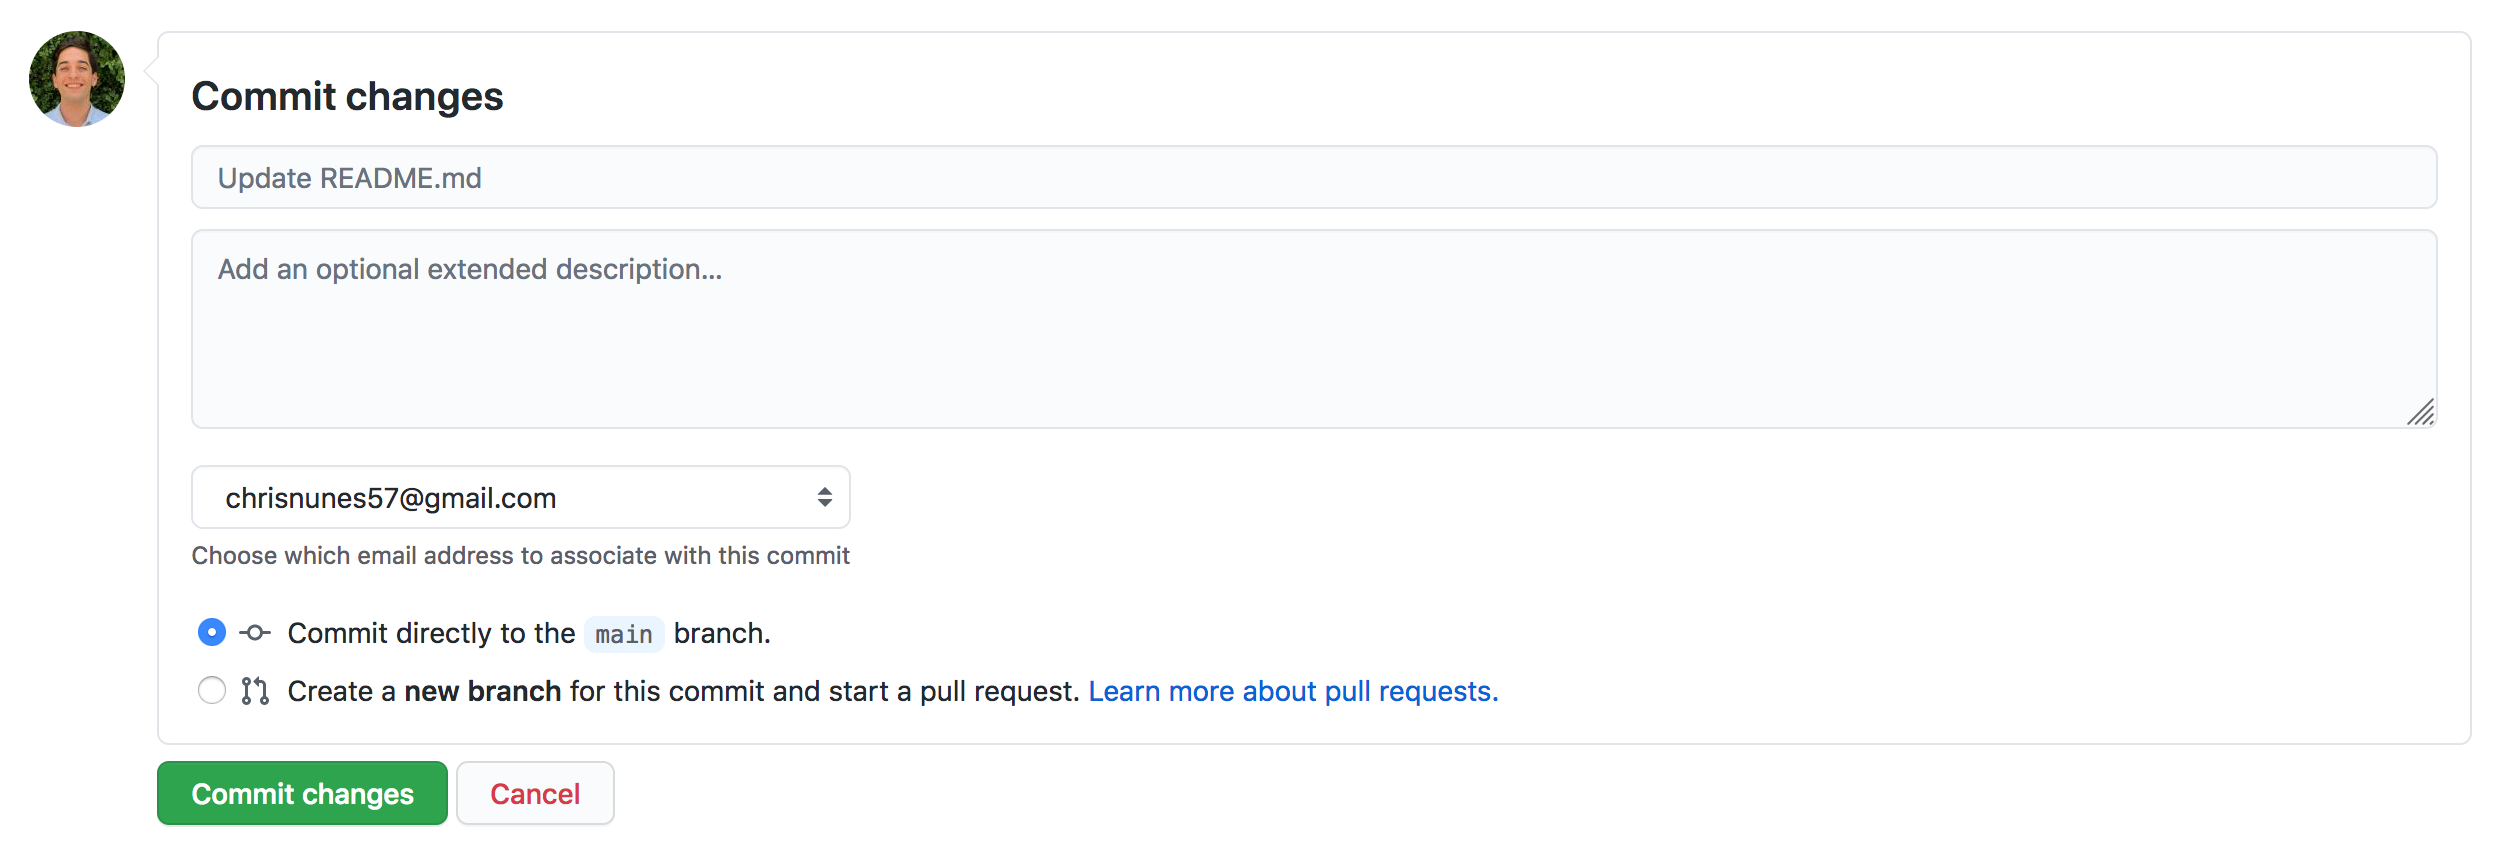
Add your commit message here
Just like we had to provide a commit message when using git commit -m "<message>", we will also need to provide a message when we make changes online. Once again, the message can be something simple, like "Changed README from Github".
Once you add your message, click the “Commit Changes” button and your changes will be saved.
Now that we have a new change on our remote branch, we need to figure out how to get that change on our local branch as well!
Pulling a Remote Change
Now that we have a change in the remote repository, we need to download, or pull, the change to our local repository.
To do this, navigate using your terminal to the git repository that we were working in before. This will be the same folder where we ran the git clone, git add and git push commands earlier.
Once there, we just need to run one command: git pull. This will download all the changes from the remote repository that we do not currently have on our local machine.
If the command is executed successfully, you will see an output similar to the output from git push or git clone.
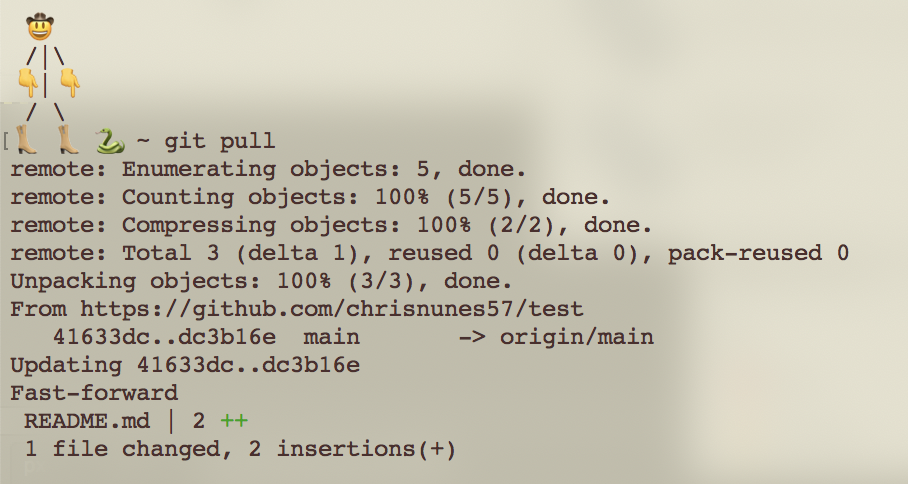
We can see the new changes highlighted in green
Now if you open your README.md file in a text editor, you’ll see that the file has the new edit that you made on Github!
Conclusion
Now you know the basics of Git! In your everyday use, you will mainly use git add, git commit, and git push. However, there is a massive world of Git uses that we didn’t cover in this tutorial, and you’ll likely run into them in the future when you start collaborating with Git.
To continue learning, I would recommend putting all of your projects into a Git repository and hosting them on Github! This is a useful way to back up your projects, and also a good way to flex your projects to your friends (and recruiters!)
On an unrelated note, below is a link to my Github account! Feel free to go follow me and star all of my cool projects 👀.